↪ This feature is available when using a Robotic Total Station.
↪ Auto Staking can be activated separately for each Layout application (Points/Lines/Objects). Once activated in an application, Auto Staking will stay activated in that application even after restart.
General description
The Auto Staking tool allows you to lay out points automatically, such as points on a ceiling, floor, wall or penetration points on walls. The tool is especially intended for situations where the coordinates of the point to be laid out do not fit to the already built area.
Lay out a point on ceiling, floor or wall
 ↪ If the total station is set up by using a tilted reference plane, the following workflow can also be applied to walls, sloped planes and roofs. Refer to 6.8 Setup Using a Tilted Reference Plane .
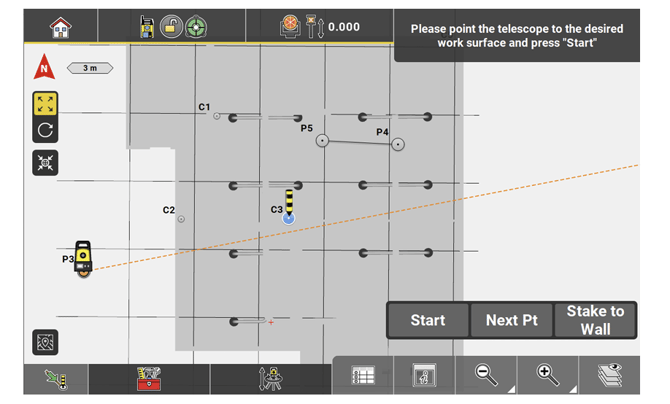
- Open the Layout Points app. Map screen is displayed.

- Select Auto Staking from the toolbox.

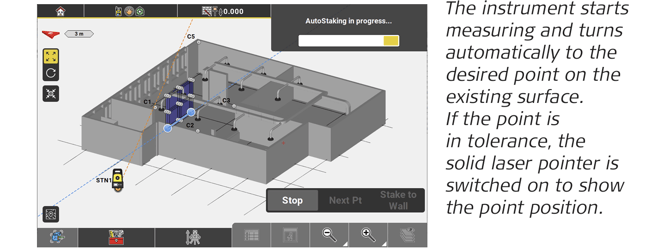
- For points on ceiling/floor: Turn the telescope to the ceiling/floor where the point shall be staked out or marked. Select the point and tap Start.
 ↪ If the point is out of tolerance, a warning message is displayed.
• Tap Continue to continue the measurement. If necessary, change the orientation of the telescope. For example, it may not be possible to lay out a ceiling point due to some objects being in the line of sight. In this case, point the telescope to the floor instead.
• Tap Accept to accept the displayed deviation. The solid laser pointer is switched on to show the point position. - Tap Store to store the measured point.
↪ You can lay out several points automatically, using the Stakeout List function:
• Create a Stakeout List or activate an existing list. Refer to 2.4
Managing Stakeout Lists.
• To display the Stakeout List toolbar, select Stakeout List
from the toolbox.
• Select Stakeout Point List from the Map Handler > View
Options to display the point list and the map side by side. Refer
to: Use a Stakeout Point List
• Select Auto Staking from the toolbox.
• Select the first point in the list and tap Start. ↪ For points on wall:
You can stake out several points on a wall automatically, using the Stake to Wall function:
• Select a point.
• In the Measure bar tap the Stake to Wall button to activate the function. • Turn the telescope to the desired wall and start the measurement. The selected point is projected to the existing wall.
• To finish staking to a wall, deselect Stake to Wall in the Measure bar. The next points will be staked to the ceiling/floor.
↪ If Stake to Wall is active, all points are staked out on a wall. If inactive, all points are staked out on the ceiling/floor.
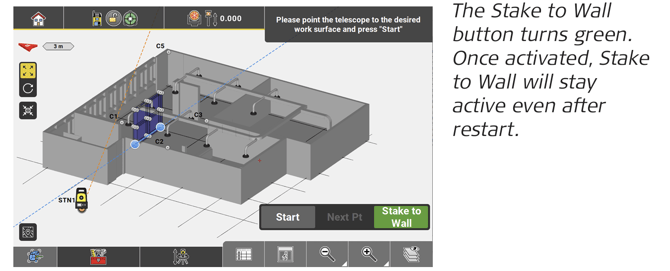
↪ Once activated, Stake to Wall will stay activated even after restart.
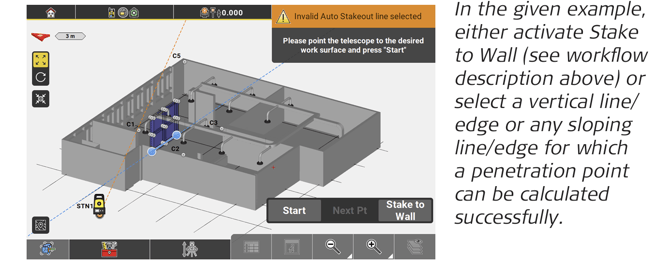
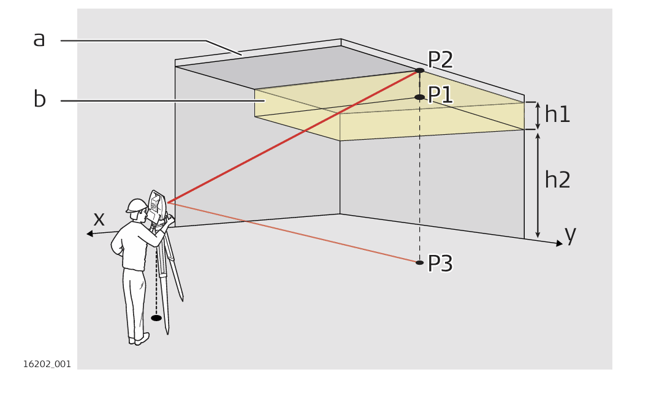
Lay out a ceiling/floor/wall penetration point 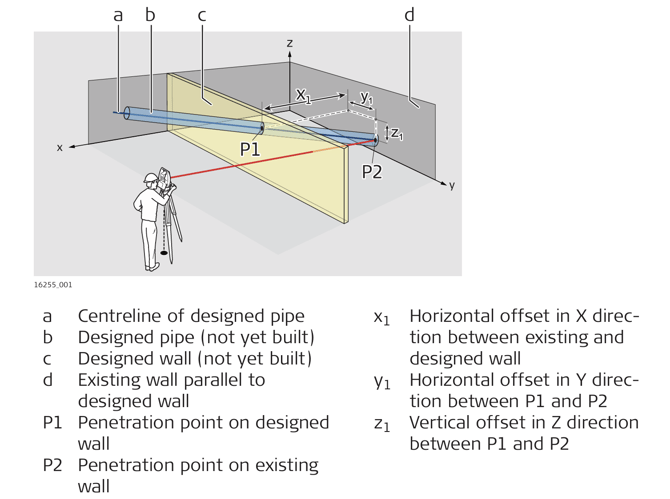
- Open the Layout Lines app. Map screen is displayed.

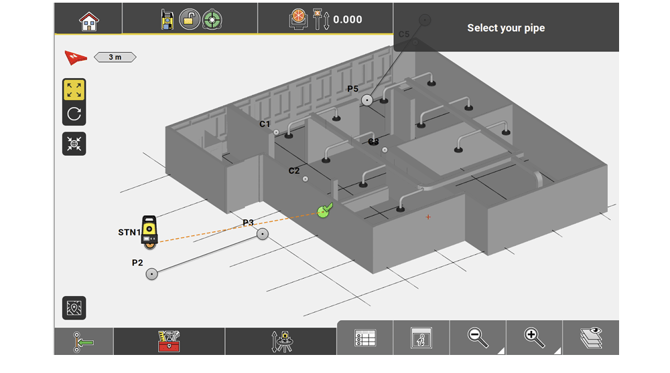
↪ To lay out penetration points, the current job should contain a line representing the centreline of the designed pipe or duct. If necessary, measure a line or create a line using the "Connect Points" tool. - Select Auto Staking from the toolbox.

- Select the line representing the centreline of the designed pipe or duct.
 ↪ In order to stake out floor or ceiling penetration points deselect Stake to Wall.
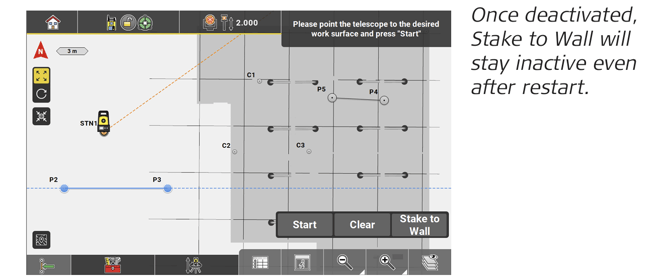
- Turn the telescope to the existing work surface (wall or ceiling/floor) where the penetration point should be laid out or marked. Tap Start.
 ↪ If the point is out of tolerance, a warning message is displayed.
• Tap Continue to continue the measurement.
• Tap Accept to accept the displayed deviation. The solid laser pointer is switched on to show the point position. - Tap Store to store the measured penetration point.
Lay out points on ceiling, floor or wall using Layout Objects
With the Layout Objects application, it is possible to lay out points or penetration points on ceilings, floors and walls.
↪ Layout Objects is an optional license and requires the "Layout Objects license". See also: General Information
- Open the Layout Objects app. Map screen is displayed.

- Select Auto Staking from the toolbox.

- Turn the telescope to the desired surface.
• For a point on a ceiling, floor or wall, select a point, endpoint of a line or point of an object. See also: Lay out a point on ceiling, floor or wall
• For a penetration point, select a line or the edge of an object. See also: Lay out a ceiling/floor/wall penetration point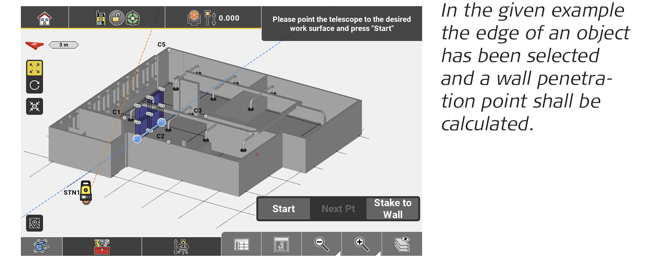
- In the Measure bar tap Stake to Wall.
- Tap Start.
- Mark the location and tap Store to store the measured point.
↪ If the point is out of tolerance, a warning message is displayed.
• Tap Continue to continue the measurement. If necessary, change the orientation of the telescope. For example, it may not be possible to lay out a ceiling point due to some objects being in the line of sight. In this case, point the telescope to the floor instead.
• Tap Accept to accept the displayed deviation. The solid laser pointer is switched on to show the point position.
↪ You can lay out several points automatically, using the Stakeout List function. For detailed instructions see: Lay out a point on ceiling, floor or wall
↪ To lay out points on a floor/ceiling, Stake to Wall must be deactivated.
↪ To lay out penetration points on the floor/ceiling, a line/edge of an object must be selected for which a penetration point can be calculated successfully. With a horizontal line being selected this would issue an error message.