General description
↪The Stakeout application iCON site + iCON build Plus well as the Layout Points/Layout Lines applications iCON build + iCON site Plus as are used to place marks in the field at predetermined points. These predetermined points are the points to be staked/laid out.  The points to be staked/laid out can:
• Be uploaded as a file to a project. Refer to Importing data to the project step-by-stepstep-by-step for more information.
• Be created within the Draw/Sketching application, and accessed directly.
Refer to 8.5 How to Draw /Sketch a Plan.
| Stake out/Lay out elements, TPS | 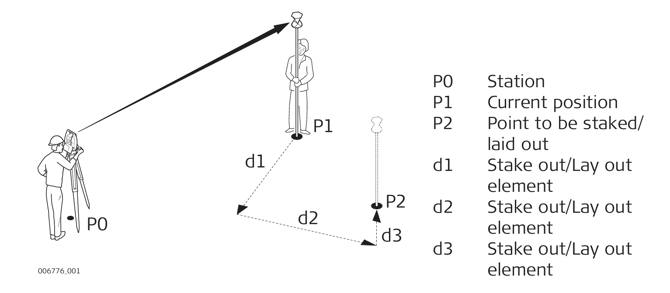 |
| Stake out/Lay out elements, GNSS | 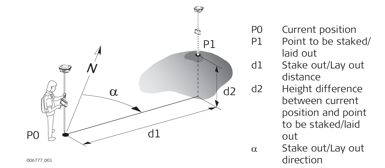 |
Associate Point ID to Stakeout/Layout point
The iCON software allows to associate a Point ID to a Stakeout/Layout point:
- iCON site + iCON build Plus Open the Stakeout app.

iCON build + iCON site Plus Open the Layout Points or Layout Lines app.
↪ Sample screenshots are taken from iCON site > Stakeout app.
- Configure the Measure bar to display Point ID, then tap Point ID. Tap on the Point ID tick box and tap
 to accept.
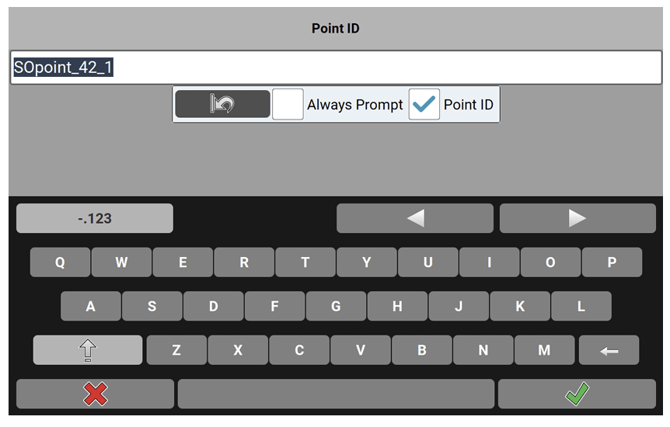
- Measure and store a new point.
 ↪ When a line is selected as stakeout element the associated name will follow this convention: start point ID minus end point ID underscore additional number. For example for a line from point ID 10 to point ID 17 it will be 10-17_1, 10-17_2 and so on.
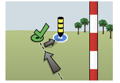
Arrow view
The arrow view displays the pole position in relation to a user-defined orientation direction. Refer to: Configuring the Orientation direction. Arrows and corresponding distances are displayed to indicate how to find the point to be stake.
↪ Arrow View is available in the following applications:
–Stakeout iCON site + iCON build Plus
–Layout Points iCON build + iCON site Plus
-Layout Objects iCON site Plus optional license
- Tap
 to access View in the Map handler.
 - Tap
 to toggle between Map view and Arrow view.
  ↪ Activate Multiview to display Map view and Arrow view side by side.
↪ Once the pole/rover is within 2 m distance to the selected point, the Arrow view automatically changes to a Bullseye view. Dynamic labels show the distance to the tar
get in X and Y directions with reference to the defined orientation. When the current position is within tolerance, the labels turn to a green colour.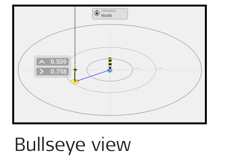
↪ To select a different point to be staked, tap anywhere in the Map
view or the Arrow view.
Use a Stakeout Point List
↪ The possibility to use a stakeout point list is available in the following applications:
–Stakeout iCON site + iCON build Plus
–Layout Points iCON build + iCON site Plus
-Layout Objects iCON site Plus optional license
- Tap
 to access View in the Map handler.
 - Tap
 to get the points to be staked/laid out displayed in a list side by side with the map view.
↪ Stakeout List needs to be available. On how to define a Stakeout List refer to: Stakeout/Layout Toolbox Functions ↪ Once the pole/rover is within 2 m distance to the selected point, the Map view automatic
ally changes to a Bullseye view. Dynamic labels show the distance to the target in X and Y directions with reference to the defined orientation. When the current position is within tolerance, the labels turn to a green colour.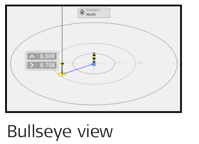
Configuring the Orientation direction
↪ Functions decribed below are available in the following applications:
–Stakeout iCON site + iCON build Plus
–Layout Points iCON build + iCON site Plus
1. Access View in the Map handler.
2. Tap Orientation Config to display the available orientation methods. The current active Orientation is highlighted in yellow.
3. Tap an orientation method to change the view direction of the Arrow view and the
Bullseye view. See also: Arrow view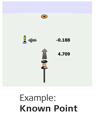
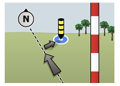
Overview of the available orientation methods
↪ Depending on the connected device, different orientation methods are available. The method TPS is only available for TPS devices. For GNSS there are the additional methods Sun and North instead of TPS.
| Method | Description |
|
TPS
|
TPS only: Aligns the view along the line of sight, from pole to Total Station. |
|
Known Point
|
Aligns the view from pole to another point of the map. That point needs to be selected during configuration to this method. |
|
Last Point
|
Aligns the view from pole to the last staked and stored point. |
|
North
|
GNSS only: Aligns the view from pole to North direction of the coordinate system. |
|
Sun
|
GNSS only: Aligns the view from pole to the direction of the sun. |

↪ Additionally, you can change the map orientation. Refer to: Configuring the map orientation
Stakeout/Layout Tools
All available Tools for Stakeout/Layout are available from within the Toolbox. 
Toolboxes are organized differently depending on the application that they belong to. In the Stakeout/Layout applications the toolboxes have sub-categories.
For details on where to find single functions refer to:
– Stakeout Toolbox functions
– Layout Points Toolbox functions
– Layout Lines Toolbox functions